In brief
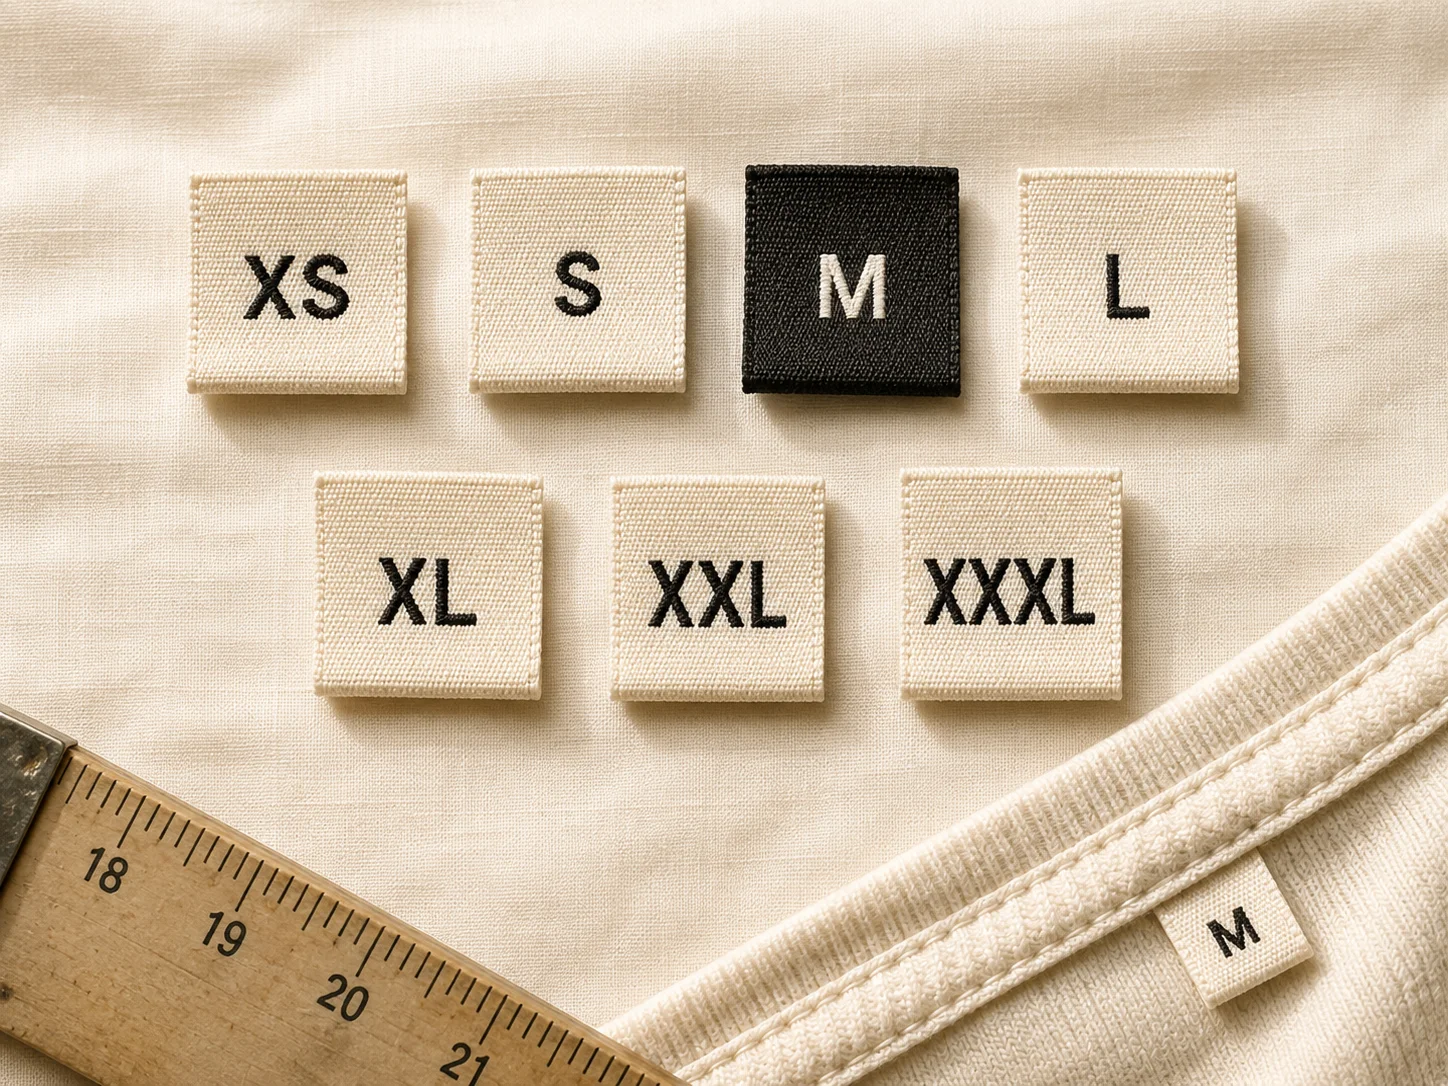
For XS to XL a 15 x 20 mm finished tab is usual, XXL and 3XL need 15 x 25 mm, and kids tabs showing age and height need 20 x 30 mm. Keep letters 5 to 6 mm tall on adult tabs, since below about 3 mm the gaps inside 8, 6 and 0 fill in after washing.
The size label is the smallest label in the garment. It is also the one buyers check most. Sometimes it carries a single letter. But it still has to survive every wash the garment goes through, and it still has to stay readable.
Size tabs go wrong in the same few ways every time. The tab is sized to fit "M", and then the same tab has to hold "XXXL". The letters are set small so they fit, then close up after a few washes. The tab gets folded and the fold lands right through the middle of a letter.
None of these are unusual factory problems. They are all decisions made before the artwork was signed off. This guide covers the sizes, then the choices around them. For every other label type, see our full clothing label size guide. For setting up files, see how to prepare label artwork.
Size for your longest code
The tab that fits XS must also fit XXXL. Otherwise you are buying two tab sizes.
Letters need room
Small letters close up on woven labels and thicken on printed ones after washing.
Folds take space
A folded tab loses half its height to the fold and both ends to the seam.
What are the standard size tab sizes?
These are finished sizes. That means the part you can see once the tab is folded and stitched in, not the flat piece before folding. Always check which one your supplier is quoting. On a folded tab the two numbers can differ by 15 mm or more.
| Size format | Finished size | Letter height |
|---|---|---|
| XS, S, M, L, XL | 15 x 20 mm | 5-6 mm |
| XXL, 3XL, 4XL | 15 x 25 mm | 5-6 mm |
| Numbers, two digits (38, 42) | 20 x 25 mm | 5-7 mm |
| Numbers with a half size (38½) | 20 x 30 mm | 5-6 mm |
| Kids, age + height (6Y / 116 cm) | 20 x 30 mm | 4-5 mm |
| Two size systems (UK 10 / EU 38) | 20 x 35-40 mm | 4-5 mm |
| Waist x length (32 x 34) | 20 x 35 mm | 5-6 mm |
| Logo and size together | 25 x 40 mm or bigger | 4-6 mm |
For a normal adult range, 15 x 25 mm is the safest single choice. It is roomy for "S" and still comfortable for "XXL". One tab size covers your whole range. Going down to 15 x 20 mm looks neater on small sizes, but you will need a second tab size as soon as you add XXL.
If you are not sure: ask for 15 x 25 mm for letter sizes and 20 x 25 mm for numbers. Then check your longest code before you approve it.
Not sure the size works? Set it in the free label designer: it shows your label at true size and warns when text drops below what a loom can weave.
How do you work out the size tab you need?
Height is mostly decided by the fold and the neck seam, so you have little choice there. Width is decided by your longest code. Sort out the width first, because that is the one that causes trouble later.
Count the letters in your longest size, not your most common one. A brand running S to XL has two letters at most. Add XXL and it becomes three. Add 3XL and you now have a number plus two letters, which is wider than three letters in most fonts. If you might add bigger sizes later, size the tab for that range now.
- Write out every size code you will ever use.
- Set them all in your chosen font at your chosen letter height.
- Measure the widest one. Add clear space on both sides.
- Add the fold allowance for the fold you have picked.
- Round up to the nearest 5 mm. Suppliers work in round numbers.
That last step matters more than it looks. If you ask for a 23 mm tab and the mill works in 5 mm steps, you either pay extra for a special size or quietly get 25 mm. Asking for 25 mm from the start avoids the confusion.
Why the longest code decides everything
Say you size your tab around "M" and later add XXL. You now have three options, and all of them are worse than planning ahead. You can shrink the letters on the big sizes, so your range no longer matches. You can run a wider tab on big sizes, so the garments look inconsistent. Or you can reorder every tab at a new size. Most brands pick one of the first two, because the third costs money nobody budgeted for.
How tall should the letters be to stay readable?
A size tab holds so few letters that it is tempting to set them small. That works on a fresh sample. It stops working after a season. On woven labels the letters close up as the threads settle. On printed labels the ink spreads slightly as the fabric softens.
- 4-5 mm: kids tabs, two size systems, or anything on two lines.
- 5-6 mm: the normal range for adult letter and number sizes.
- 6-8 mm: useful when staff sort garments in bulk by size.
Below about 3 mm, the small gaps inside letters start to fill in. Think of the holes in 8, 6, 0 and R. On a woven label this is a hard physical limit, the weave cannot make a gap thinner than a few threads. This is exactly how an 8 ends up reading as a 6, and it is the most common problem with number sizes.
Pick a plain, open font. Narrow fonts let you fit more letters in the same width, which is tempting when space is tight. But narrow fonts also shrink those inside gaps, so the closing-up problem arrives sooner. If a code does not fit, make the tab wider instead of squeezing the font.
Quick check: hold the approved sample at arm's length in normal room light. If you have to bring it closer to tell a 6 from an 8, the letters are too small or too narrow.
Separate size tab, or size on the neck label?
This choice affects how much stock you have to hold. It is worth deciding properly instead of copying whatever your last supplier did.
With a separate size tab, your main neck label is the same for every garment. Only the small tab changes. You buy one neck label in bulk plus a set of small tabs, one per size. Reordering is simple, because your expensive label does not depend on size. Adding a new size means ordering one new tab, not a new neck label.
With the size printed on the neck label, the garment carries one clean label instead of two. The cost is stock. Every size is now a separate item. Ten sizes means ten labels to order, count, store and reorder. If you guess wrong on one size, you are left with labels you cannot use on anything else.
- Pick a separate tab if you have a wide size range, change your range often, or your neck label is complex and costly.
- Pick a combined label if your range is narrow, or a second label would look cluttered in a premium garment.
- Pick a combined label if you are going tagless, where every extra piece is an extra step on the line.
There is a middle option. You can use one combined label design where the size sits in a fixed spot and only that letter changes. You still need one label per size, but the artwork is a single file with one swapped character. That cuts down on proofing and stops the versions drifting apart over time.
How do kids and age-based size tabs differ?
Children's size tabs usually carry more information than adult ones. Age, height, sometimes both, sometimes a chest measurement too. All of that has to fit on a smaller garment. That is the tension you have to solve.
A tab reading "6Y / 116 cm" has far more characters than "M", but it sits in a much smaller neck. Putting both on one line needs around 30 mm of width at a readable size. Two lines need less width, but the height has to go to 20 mm or more, which can be too deep for a small neck.
- Age only (2Y-6Y): 15 x 20 mm is comfortable.
- Height only (98-116 cm): 15 x 25 mm.
- Age and height on one line: 20 x 30 mm.
- Age and height on two lines: 20 x 25 mm with 4 mm letters.
- Newborn sizes in months (0-3M): 15 x 25 mm.
Softness is a real requirement in kidswear, not a nice-to-have. A stiff tab against a child's neck is why the garment gets returned, or why a parent cuts the label out. Either way the size information is gone. A satin or soft woven tab solves it, and so does moving the tab to a side seam. Many kids brands print the size straight into a tagless neck print for the same reason.
How do you show two size systems for export orders?
If you sell in more than one country, you usually have to show more than one size system. UK 10 and EU 38 are the same garment. A buyer in either country wants to see the number they know. This is mainly a width problem.
Two systems on one line, "UK 10 / EU 38", needs 35 to 40 mm at a readable letter size. Stacking them on two lines brings the width down to about 25 mm, but the height has to go to 20 mm. A third system is more than a neck tab can hold comfortably. At that point the sizing usually moves to the care label or onto a sticker on the packaging.
- Decide the order of the systems and keep it the same across your whole range.
- Use one separator throughout, a slash or a dot, not both.
- Check whether your export market expects a particular system.
- Check whether the size also has to appear on the outer packaging.
Worth checking early. Some markets expect a certain size system, and some retailers write it into their supplier rules. It is cheap to confirm before the tabs are made and expensive afterwards, because you cannot edit a size tab. You can only replace it.
Fold types for size tabs
The fold decides how much of the label you actually see, and how it sits in the neck. Getting this wrong is what gives you a tab that looked right in the artwork and wrong in the garment.
- Centre fold: the label folds in half and both raw ends go into the seam. The standard for size tabs. You see roughly half the flat height, so a 20 mm visible tab starts as a 40 mm-plus flat piece.
- End fold: both short ends fold under and the label lies flat, stitched at both sides. Neater when the tab sits on a flat panel instead of in a seam.
- Loop fold: both ends are caught together so the tab forms a loop. Common under a neck label and easy to sew into the same seam.
- Straight cut: no fold, just sealed edges. The cheapest option, best when the edge is fully hidden in the seam.
On a centre-fold tab, keep the fold line clear. Text sitting on the fold gets a permanent crease through it. The fold is pressed in during finishing and does not come out. Leave at least 3 mm clear either side of the fold, and never let a letter sit across it.
Our no-fold label guide and end-fold guide cover how each style works. The choice depends on how the neck is sewn, so check with whoever is making the garment rather than deciding on looks alone.
Where the tab goes
The usual spot is centre back neck, right under the main label. That is where buyers look, and it can be sewn in during the same step as the neck label, which keeps things simple on the line.
- Under the neck label: the standard. Loop or centre fold, sewn into the neck seam.
- Beside the neck label: works when the neck label is wide and the tab is narrow.
- Side seam: used when the neck has to stay clear. Common in kidswear and next-to-skin garments.
- Waistband: standard for trousers, skirts and shorts, usually inside at centre back.
- On the care label: saves a piece, but ties your size to a label that also carries fabric and washing information.
Whichever spot you pick, keep it the same across the range. Someone comparing two garments should find the size in the same place on both. This matters in shops, where staff handle hundreds of garments and consistency is what makes them quick.
Check the placement on your smallest garment first. A tab that sits nicely under the neck label on an XL can crowd the shoulder seam on an XS, because the neck opening is narrower but the tab has not changed.
Material and finish
Size tabs are usually made in the same material as the neck label so the two match. Where they differ, it is normally because the tab is small enough that a nicer material becomes affordable.
- Woven damask: the most hard-wearing and the most premium. Letter detail is limited by the weave, so keep the type generous.
- Woven taffeta: good value and reliable, slightly crisper feel than damask.
- Printed satin: the finest letter detail and the best choice for small or complex codes. Softer against skin.
- Printed cotton: soft and natural-looking. Suits organic and kidswear ranges.
- Heat transfer: no separate label at all. Printed straight onto the fabric, standard for tagless.
Match the tab to the neck label in both material and colour. A woven neck label next to a printed satin size tab reads as two odd labels rather than a set, because the two surfaces catch light differently even when the colours are identical on paper.
If the tab touches skin, feel the edge on a real sample rather than trusting the spec sheet. A woven tab with a hard cut edge can be noticeably scratchy at the back of the neck, exactly where a customer will notice it.
Colour and contrast
Contrast on a size tab is practical, not decorative. There is only one thing on the label and it has to be readable.
- Dark letters on a light background is the clearest and most forgiving option.
- Light on dark looks more premium and suits black or navy neck labels, but the letters need enough weight to hold up.
- Avoid tone-on-tone. Grey letters on light grey photograph beautifully and are unreadable in a shop.
- Write down the exact thread or ink references for reorders.
On woven labels, light-on-dark is the harder direction. The letters are made of threads sitting on a dark background, and thin strokes can disappear into it. If you want light on dark, make the letters bolder rather than bigger. A slightly heavier letter reads cleanly where a larger thin one still does not.
Write down your colour references after the first order. Size tabs get reordered often, in small quantities, and small repeat orders are exactly where colour drifts. A recorded thread number costs nothing and stops this season's garments looking different from last season's.
Artwork and safe margins
Size tab artwork is simple, so it often gets less attention than it needs. The margins are the part that matters. The tab is small, and the share of it lost to seams and folds is large.
- Leave at least 2 mm between the text and any stitched edge.
- Leave 3 mm clear either side of a fold line.
- Send artwork as vector files with the fonts converted to outlines.
- State the finished visible size and the fold, not just one number.
- Send every size code in one file so the whole set can be checked together.
- Give letter height in millimetres, not points.
Giving letter height in millimetres removes a real source of error. A point size means different physical heights in different fonts, and your supplier is matching a physical measurement on a loom or press. Giving them the millimetre figure directly skips the guesswork.
Send all your size codes as one artwork set, not one file per size. Checking them together is the only reliable way to spot a code set in the wrong weight, an odd separator, or a size that is simply missing. Sent one at a time, these slip through all the time.
How many of each size should you order?
Size tabs are the one label where quantity is not spread evenly. A range that sells mostly M and L needs far more of those tabs than XS or 3XL. Ordering equal quantities across the range guarantees you will run short on some and be left holding others.
- Base your split on real sales history if you have it.
- For a new range, weight the middle sizes and taper towards the ends.
- Order tabs slightly ahead of garment numbers to cover sewing wastage.
- Keep the split written down so a reorder can be repeated, not re-guessed.
The economics push the other way, which is the tension. Minimum order quantities usually apply per size code, so a ten-size range can mean ten minimums. This is a strong argument for the separate-tab approach. Your expensive neck label gets ordered once in bulk, and only the cheap tabs carry a minimum each.
If the per-size minimum is your limit, ask whether every size really needs its own tab. Some brands combine nearby sizes where the fit allows. Others run a shorter size range in the first season and add sizes once they know what actually sells.
Getting size tabs made at Labelwala
We make woven and printed labels in Ahmedabad, Gujarat, and we have been doing it for 25 years. Size tabs are one of the most common things we quote, usually alongside a neck label and a care label as one set.
- Minimum order: 1,000 pieces. Tell us your split across sizes when you ask and we will confirm how it applies to your order.
- Quotes: we usually reply within 2 hours on a working day.
- Production: 7-10 days once artwork is approved. Rush jobs run 3-5 days.
- Care symbols: we set these to ISO 3758 when the size sits on a combined care label.
- Delivery: we serve customers across India. Timelines depend on destination and consignment size.
Send us your full list of size codes rather than just one. Seeing the whole set lets us check the widest code fits the tab you want before anything is made, which is the single most useful thing you can do at quote stage. If you are unsure about the size, send the codes and we will recommend a width.
We are rated 5.0 on Google from 27 reviews. If you want to see how a size tab feels before committing to a full run, ask for a sample when you request the quote.
Common mistakes
- Sizing the tab around a mid-range code, then finding XXXL does not fit.
- Setting letters small enough that the inside gaps fill in after washing.
- Letting a letter sit on or near the fold line.
- Using a narrow font to solve a width problem.
- Quoting a flat size when you meant finished size, or the other way round.
- Pairing a woven neck label with a printed size tab and expecting them to match.
- Ordering equal quantities of every size.
- Approving one size code and assuming the rest of the set is fine.
- Choosing tone-on-tone colours because they look smart in a render.
- Forgetting the tab will be reordered, and not writing down thread or ink references.
Nearly all of these are decided before anything is made. A size tab is too small to fix afterwards. You cannot trim it or edit it, only replace it, which is why the specification stage carries so much weight.
Sample checklist
Approve a real sample of your longest code, not the shortest, and not just a digital proof. A proof confirms the artwork. Only a physical sample shows you how the material handles it.
- Does the longest code fit the width, with clear space on both sides?
- Are the inside gaps of letters still open at arm's length in normal light?
- Does the fold line stay clear of every letter?
- Does the tab sit properly under the neck label on your smallest garment?
- Do the material and colour match the neck label side by side?
- Is the edge comfortable against skin?
- Does the finished size match what you asked for?
- Is the letter height the same across every code in the set?
- Has the tab been through at least one wash before you sign off?
That last one gets skipped most often and tells you the most. A single wash shows whether the letters close up, whether the fold holds, and whether the colour shifts. Those are the three problems that otherwise only appear once the garments are with customers.
What to send your supplier
A size tab brief is short. But leaving out the fold, or not saying whether your size is flat or finished, causes most of the back-and-forth. Include these and your quote should come back without a round of questions.
- Every size code, written exactly as it should appear.
- Finished visible size in mm, and say that it is the finished size.
- Fold type: centre fold, end fold, loop fold or straight cut.
- Material: woven damask, woven taffeta, printed satin or printed cotton.
- Background and text colours, with references if you have them.
- Letter height in mm.
- Quantity per size code.
- Where the tab goes, so the supplier can check the fold makes sense.
- Whether you want a physical sample before the full run.
Here is a brief that works: "Size tabs, XS to 3XL, 15 x 25 mm finished, centre fold, woven taffeta, black background with white text, 5 mm letters, loop-folded under the neck label, quantities per attached split." That is enough to quote and proof against without a follow-up call.
What we would recommend
For most adult ranges, go with 15 x 25 mm finished, centre fold, 5 to 6 mm letters, in the same material as your neck label. That one spec covers XS through 3XL without a second tab size and without crowding the small end of the range.
Move to 20 x 25 mm for number sizes, 20 x 30 mm for kids tabs showing age and height, and 20 x 35-40 mm for two size systems. Keep 2 mm clear of stitch lines, 3 mm clear of the fold, and pick your width from the longest code you will ever run, not the one you are launching with.
Most of all, wash the sample before you approve it. A size tab that reads clearly on day one and unclearly after a season is a tab that will cost you returns. One wash cycle tells you which one you have.